
Skip the intro · jump to the list ↓
Here is a tip nobody tells beginners. Cold milk pours better than warm milk when you’re first learning latte art. It gives you a few extra seconds to see what you’re doing before the foam sets, lol!
That one trick alone saved me from about a hundred sad, lopsided hearts. Little details like that are exactly what this list is about.
I scrolled through hundreds of pins looking for ideas that actually work in a regular kitchen. No fancy espresso machines required, no barista certification needed. Just simple tricks anyone can try this weekend.
Some of these are technique focused, like pitcher angles and pouring speed. Others are more about setting up a coffee corner that makes your morning feel a little fancier.
Every idea below got picked because it’s realistic. Nothing here needs fifty dollars of equipment or a culinary degree, I promise.
Grab your favorite mug and let’s get into it. Under each one you’ll find the little details that actually matter, plus a link to the full tutorial.
LATTE ART AND COZY COFFEE IDEAS
Perfect Heart Latte Design
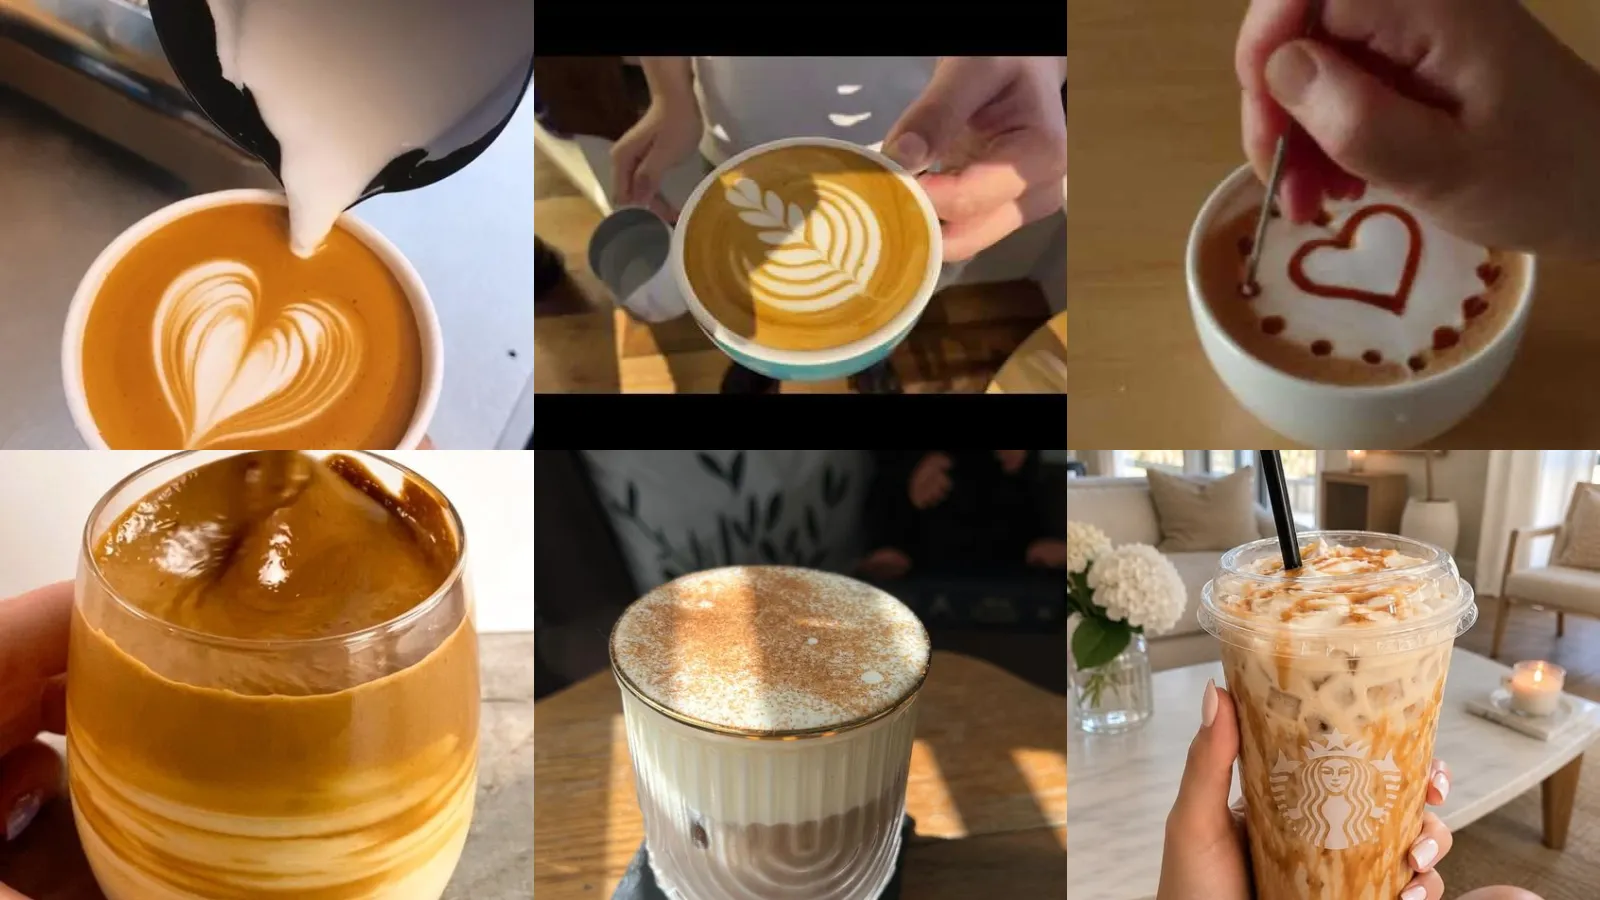
The heart is where every latte art journey starts. For good reason. It only takes one steady pour and a little wrist flick at the end.
Steamed milk gets poured from a height first, then the pitcher drops close to the surface. That’s when the heart shape actually forms.
Get this one down and every other pattern gets easier.
- The one every beginner should master first
- Just one pour, no fancy tools
- Works with any home espresso setup
Simple Rosetta Pour Technique
Rosettas look complicated but the motion is actually pretty simple once you feel it. It’s a gentle side to side wiggle while pulling the pitcher backward.
The leaf pattern that forms looks like something from a coffee shop window. Practice the wiggle over a sink a few times before you try it in an actual cup, haha!
- The wiggle move that fools everyone
- Rewarding once the motion clicks
- Great party trick for guests
Best Milk Frothing Method
Good latte art starts long before the pour. It starts with milk that’s steamed to the right texture, silky and glossy with tiny microbubbles.
A thermometer helps here more than people expect. Milk steamed past 150 degrees starts losing that glossy paint like texture you need for clean designs.
This step matters more than the pour itself, honestly.
- The step everyone skips and shouldn’t
- A cheap thermometer changes everything
- No steam wand needed either
Tulip Pattern Step By Step
Tulips are basically a few hearts stacked on top of each other. Pour a small dot, push the pitcher forward slightly, then repeat two or three times.
Finish with a straight pull through the center to give it that layered petal look.
It’s fussier than a heart but so satisfying once it lands.
- Little hearts stacked into one big flower
- Takes some patience but so worth it
- Looks incredible in a wide cup
Etching Tools For Beginners
Not ready to free pour yet? No shame in that. Etching tools let you draw designs right on top with chocolate syrup or cinnamon.
A simple wooden skewer or a specialty etching pen works fine here. Draw stars, swirls, even little pumpkins if the season calls for it.
This is where beginners get to feel like artists immediately.
- The shortcut that still looks handmade
- A skewer from the kitchen drawer works
- Chocolate syrup does most of the magic
Latte Art Pitcher Angle Guide
Pitcher angle is the quiet hero of every good design. Too high and the milk sinks instead of sitting on top.
Hold it close to the surface, almost touching. Tilt the cup slightly toward you. That tiny angle change fixes so many messy pours.
- The angle that fixes almost every mistake
- A small tilt makes a big difference
- No new equipment required at all
Practice Board For Latte Art
A practice board sounds intense but it’s really just a printed target under a clear cup. It helps you see exactly where your pour lands.
Some people use a cutting board with a circle drawn on. Others print little worksheets online and slide them under a glass mug.
Either way, it turns guesswork into something you can actually measure.
- The cheat sheet nobody tells you about
- A printed circle changes everything
- Works with any clear glass mug
Cozy Coffee Corner Setup
A cozy coffee corner doesn’t need a whole room. A small shelf, a warm light and your favorite mugs on display already does the job.
Add a little basket for filters or pods so nothing looks cluttered. Aesthetic coffee ideas home setups usually start with just decluttering one counter.
It’s amazing how much better coffee tastes when the corner looks nice.
Minimalist Coffee Bar Styling
Minimalist styling is about picking a color story and sticking to it. Neutral canisters, matching mugs, one wood tray to hold it all together.
Skip the extra gadgets sitting around unused. A clean counter photographs better and honestly feels calmer every morning too.
Morning Coffee Ritual Aesthetic
Morning coffee rituals feel special when there’s a little routine attached. Warm the cup first, grind fresh beans, let the smell fill the kitchen before pouring.
Light a candle or open the blinds while the espresso brews. Small moments like this make the whole morning feel slower.
Who doesn’t love a five minute pause before the day starts, am I right?
Fluffy Vanilla Whipped Coffee
Whipped coffee had its viral moment a few years back and it’s still worth making. Whisk instant coffee, sugar and hot water until it turns fluffy and pale.
Spoon that cloud over cold milk and stir right before drinking. One of my favorite whipped coffee recipes uses a splash of vanilla in the milk for extra flavor.
It looks like dessert but tastes like an actual coffee break.
- The fluffy trend that’s actually still worth it
- No espresso machine needed at all
- A hand mixer speeds this way up
Brown Sugar Cold Foam
Brown sugar cold foam tastes like a caramel milkshake basically disguised as coffee. Blend heavy cream, brown sugar and a splash of cinnamon until thick and pourable.
Spoon it over iced espresso and watch it float on top like a little cloud.
This is the upgrade that makes homemade iced coffee taste like a coffee shop order.
- The caramel cloud sitting on top
- Keeps well in the fridge overnight
Vanilla Sweet Cream Foam
Vanilla sweet cream foam is simple, classic and hard to mess up. Heavy cream, a splash of vanilla and a bit of simple syrup whipped together does the trick.
Pour it over any iced drink and it turns instantly fancy.
- The classic that never goes out of style
- Just three ingredients from the fridge
- Tastes like a coffee shop staple
Cinnamon Honey Cold Foam
Cinnamon honey cold foam feels like autumn in a glass no matter the month. Whip cream, honey and a pinch of cinnamon until it holds soft peaks.
It pairs beautifully with a plain black iced coffee.
One of the flavored cold foam recipes I keep coming back to, honestly.
- The one that tastes like autumn always
- Honey instead of the usual sugar
Pink Strawberry Iced Latte
This pink strawberry iced latte looks like it belongs on a cafe menu. Blend fresh strawberries with a little sugar, strain it and pour over ice with milk. If you were hunting for pretty iced drinks ideas, this one is a keeper!
Add the espresso last so you get that pretty layered look before stirring.
It’s easily one of the prettiest iced drinks ideas on this whole list.
- The layered look that photographs itself
- Fresh strawberries beat the syrup version
- Layers best in a tall clear glass
Matcha Iced Latte Layers
Matcha layers are all about patience and a steady pour. Milk goes in first, then ice, then the matcha poured slowly over the back of a spoon.
The green sits right on top instead of mixing everywhere. It’s a small trick that makes a huge visual difference.
- The green layer that stays put
- A spoon trick keeps the layers clean
- Sift the matcha for zero clumps
Caramel Drizzle Iced Coffee
Last but definitely not least, a caramel drizzle iced coffee never goes out of style. Drizzle caramel sauce around the inside of the glass before pouring anything in.
The coffee slides down and drags streaks of caramel with it. Simple, sweet and it takes about two minutes to put together.
- The two minute upgrade that looks fancy
- Drizzle before the ice, not after
Just a little note - some of the links on here may be affiliate links, which means I might earn a small commission if you decide to shop through them (at no extra cost to you!). I only post content which I'm truly enthusiastic about and would suggest to others.
And as you know, I seriously love seeing your takes on the looks and ideas on here - that means the world to me! If you recreate something, please share it here in the comments or feel free to send me a pic. I'm always excited to meet y'all! ✨🤍
Xoxo Isabella
✨ Wait! Your next favorite is right here
These are the posts readers open next. See why: