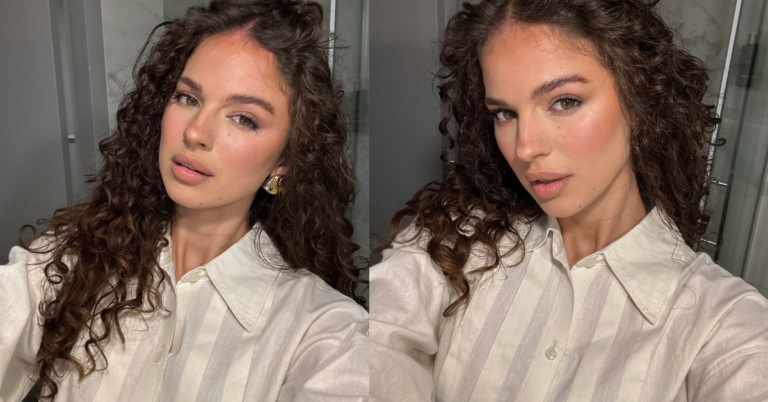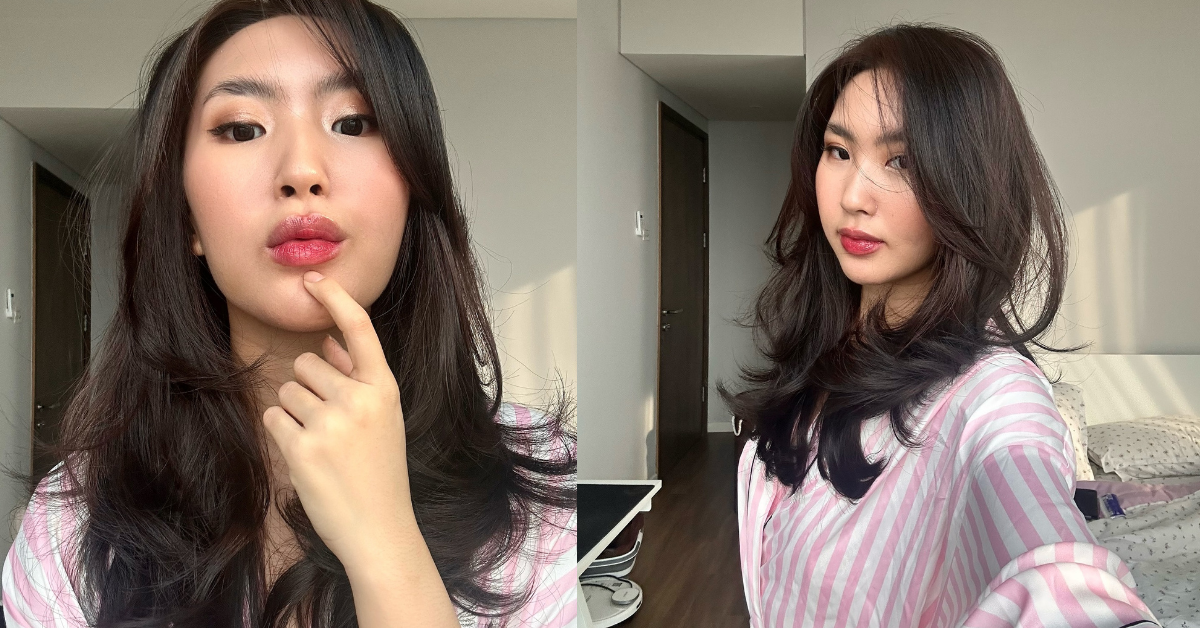
Hey guys, let’s grab a coffee, or an iced matcha, or whatever you are sipping on right now, cause we seriously need to talk about hair today. I don’t know about you, but my feed has been totally flooded lately with these massive, bouncy, glamorous curls. It is giving major Old Hollywood energy, but somehow it doesn’t look like a costume? Like, people are wearing this hair with baggy jeans and a baby tee to go buy groceries. I am literally obsessed.
We are calling them Modern Retro Curls, and let me tell you, this is the official vibe of 2026. Forget the super stiff ringlets from back in the day, and we are definitely moving past those barely-there beach waves that we all wore for way too many years. We want volume. We want movement. We want hair that looks like it has secrets.
Honestly, between you and I, I used to be so scared of vintage styling. A couple of years ago, me and my friend Sarah tried to do authentic 1950s pin curls for a New Years Eve party. Girl, it was a disaster. I ended up looking exactly like a wet poodle. I almost cried in her bathroom and ended up throwing my hair in a messy bun anyway. But the modern version? It is so much more forgiving. You don’t have to be a professional stylist to get this right. You just need a little patience and the right technique.
What Actually Makes It “Modern”?
Okay, so what is the actual difference between vintage hair and this new 2026 version? It is all in the texture. Authentic retro curls were usually set with crazy strong lotions and then sprayed until they felt like a literal helmet. You could tap on those hairstyles and they would probably knock back.
Our modern version is soft. Like, run-your-fingers-through-it soft. It has the shape and the glamorous bounce of a vintage set, but the texture is totally lived-in and touchable. If the wind blows, your hair should move, not stay perfectly frozen in mid-air. You get what I mean?
Plus, we are pairing it with completely different outfits now. The contrast of having this super luxurious, bouncy blowout while wearing your favorite oversized sweater is just perfection. It brings the whole look down to earth. I tried it last weekend for a super casual brunch date, and the barista gave me a free pastry just because she loved my hair. Not even joking! That is the power of a good hair day.
The Prep: We Gotta Build The Foundation
Before we even touch a hot tool, we have to talk about prep. I know it is annoying and we all just want to skip to the fun curling part, but if you skip the prep, your curls will drop in an hour. Just trust me on this.
You want to start with clean, dry hair. If your hair is too silky, it won’t hold the shape. I learned this the hard way during my freshman year of college. I had this big formal event, washed my hair, conditioned it forever, and then tried to curl it. Half an hour later my hair was completely straight again. So frustrating!
Now I always use a really good thickening mousse on damp hair before I blow dry. It gives the hair some “grit” and memory. After your hair is 100% dry, spray a heat protectant everywhere. Please do not fry your beautiful hair. We want bounce, not breakage.
The Tools You Actually Need
You don’t need a million expensive gadgets for this. Keep it simple. You just need three things to crush this look:
- A 1-inch or 1.25-inch curling iron. Notice I said iron, not a wand. You need the clamp! The clamp is what smooths the hair out and gives you that polished, retro look.
- Velcro rollers or metal duckbill clips. This is the secret sauce. You have to let the curls cool down in their shape.
- A smoothing bristle brush. Not a regular wet brush. You need something with boar bristles to soften the curls together.
Speaking of tools, a quick funny story. When I was like 19, I tried using a curling wand without the heat glove because I thought I was a pro. I dropped it directly on my forehead and had a burn mark for three weeks. I had to get bangs just to hide it! So yeah, use an iron with a clamp, and please be careful.
The Step-by-Step Guide (Let’s Do This!)
Alright, let’s get into the actual doing part. Turn on some good music, grab your mirror, and let’s get to work.
Step 1: Sectioning is Everything
Do not try to curl huge chunks of hair at once. It just won’t work. Divide your hair into three sections – bottom, middle, and top. Start at the bottom. The sections you curl should be about the same width as your curling iron barrel. If you take too much hair, the heat won’t penetrate evenly.
Step 2: The Curling Technique
Here is where the magic happens. For modern retro curls, we want all the hair around your face to be curled INWARD, toward your face. I know, I know. For the last ten years, we have been told to always curl away from the face for beach waves. But we are doing vintage today! Curling inward gives you that classic Hollywood swoop.
Clamp the ends of your hair and roll the iron all the way up to your roots. Hold it for about 8 to 10 seconds. You want it hot, but don’t burn it.
Step 3: The Pin and Cool (Do Not Skip This!)
When you release the curl from the iron, do not just let it drop! Catch it in your hand while it is still perfectly coiled and hot. Then, either roll it up into a velcro roller, or use a duckbill clip to pin the little curl circle directly to your head.
Why do we do this? Because hair sets its shape as it cools down, not while it is hot. If you let it hang while it cools, gravity is going to pull all your volume out. Pinning them up makes the bounce last for literally days. Keep going around your whole head until you look like somebody’s fabulous grandmother setting her hair for Sunday church.
Step 4: The Waiting Game
Now you wait. Let the rollers sit for at least 20 minutes. Usually, this is when I do my makeup, drink my coffee, or stress over what I am going to wear. Do not take them out until your hair is completely, 100% cool to the touch.
Step 5: The Brush Out (The Scary Part)
Okay, this is the part where everybody panics. Take all the clips and rollers out. Your hair is going to look crazy. You are going to have tight, bouncy ringlets all over your head and you will probably think, “Oh no, Anne ruined my hair.”
Deep breath. Take your boar bristle brush and start brushing. Not just a little bit. Brush it hard. Brush all the curls together. The more you brush, the more those separate tight ringlets will merge into one continuous, gorgeous, glossy wave. It feels so wrong to brush out a fresh curl, but it is the absolute most important step of the whole routine.
You might need to brush for a full five minutes. Seriously. Just keep brushing until the wave pattern forms. You will suddenly see the vintage shape appear like magic.
Making It Last For Days
You just put all this effort in, so we want this to last, right? Finish the look with a flexible hold hairspray. You don’t want the crunchy stuff. You want a spray that lets the hair move but keeps the frizz away.
To sleep on it, I highly recommend a silk bonnet or at least a silk pillowcase. Just twist the hair gently into a loose bun at the very top of your head with a silk scrunchie. When you take it down the next morning, the curls will be even softer and honestly, second-day retro curls are my absolute favorite. They have that perfect messy-glam vibe.
I remember one time I spent an hour doing this exact routine for a date. I walked outside, and it immediately started downpouring. No umbrella. I was devastated. But because I had pinned the curls and let them set properly, when my hair dried, it still had this amazing wave to it. So the technique really does save you sometimes!
Just a little note - some of the links on here may be affiliate links, which means I might earn a small commission if you decide to shop through them (at no extra cost to you!). I only post content which I'm truly enthusiastic about and would suggest to others.
And as you know, I seriously love seeing your takes on the looks and ideas on here - that means the world to me! If you recreate something, please share it here in the comments or feel free to send me a pic. I'm always excited to meet y'all! ✨🤍
Xoxo Isabella